Why Your Home Green Screen Looks Bad — and the Lighting Fix That Actually Works
 Natalie Brooks · Jul 4, 2026 · 8 min read
I've built home video studios with green screens for content creators, corporate communicators, and educators since 2019. The most common support request I get after setup: "why does my green screen key look muddy?" The answer is almost always lighting — specifically, that the person tried to use one light source for both the subject and the background. Here's the setup that actually works.
A green screen for chroma key is one of the most requested home studio additions — and one of the most often incorrectly set up. The green screen itself is cheap. The technique works. But clean chroma keying in a home studio requires understanding a few specific principles that separate crisp virtual backgrounds from the green-tinged, hair-losing results most first attempts produce.
The fundamental rule: the green screen and the subject must be lit independently. Everything else follows from this.
How Chroma Key Green Screen Actually Works
Chroma key is a software process that identifies pixels of a specific colour (the key colour, typically green) and replaces them with another image or video layer. Video editing software — Premiere Pro, Final Cut Pro, DaVinci Resolve, even OBS Studio for live streaming — all include chroma key tools that perform this replacement in real time or during export.
For the replacement to work cleanly, the software needs a clear, consistent colour to key on. This requires:
- Even illumination across the green screen — no shadows, no hot spots, consistent brightness edge to edge
- The green screen to be a different hue from any colour in the subject's clothing, hair, or accessories
- Physical separation between the subject and the screen to minimise colour spill (green light reflecting off the screen onto the subject)
When any of these conditions fail, the key fails. Shadows on the screen produce areas of darker green that the software may not key correctly, leaving green patches. Colour spill produces green fringing around the subject's edges. A subject wearing anything green will key out along with the screen.
Setting Up a Green Screen in a Home Studio
Choosing the Right Green Screen
Fabric screens (muslin or polyester) are the most common choice for home studios. They fold compactly, are inexpensive ($30–80 for a 2×3m screen), and work well when properly lit. The limitation: wrinkles. A wrinkled green screen creates shadows that complicate keying. Hanging it taut or steaming wrinkles before use is essential.
Collapsible/reflective screens (with a pop-out frame) are faster to set up but less adaptable for large areas or unusual spaces.
Painted walls work for permanent setups. Chroma key green paint (standard RAL colour 6037 "Pure Green") applied to a smooth wall produces excellent results because it eliminates wrinkle shadows entirely. This is the professional broadcast standard.
Paper backgrounds (seamless paper rolls in chroma green) are used in commercial photography and video studios. They're expensive ($100–150 per roll), not reusable after floor contact, but provide the smoothest, most consistent surface.
For most home studios, a fabric screen on a stand system is the practical starting point. Keep it taut and well-lit.
Lighting: The Part That Determines Whether This Works
This is where most home green screen setups fail.
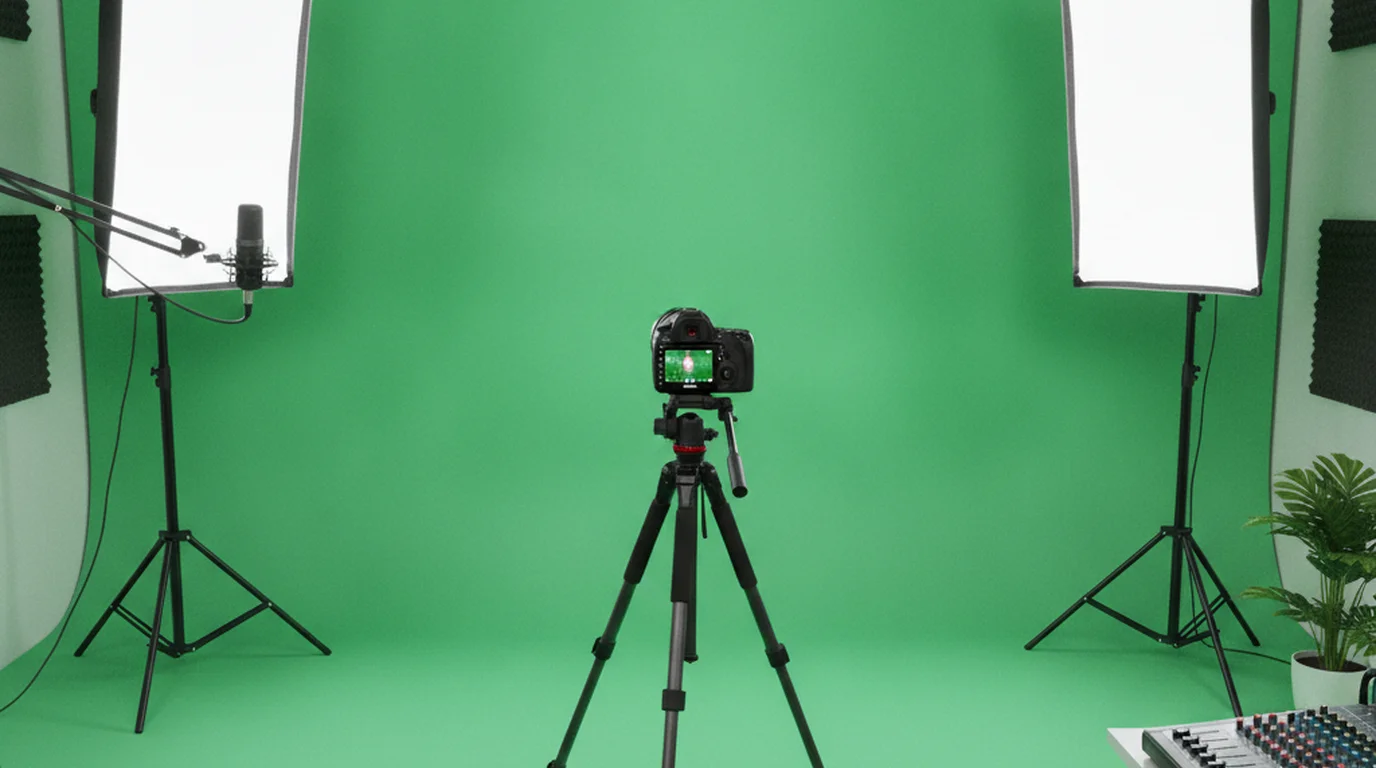
Light the green screen separately from the subject. The minimum effective setup:
- Two lights on the green screen: Positioned at 45 degrees to either side of the screen, aimed to illuminate the screen evenly without illuminating the subject. Soft, diffused light (through a softbox or umbrella) produces more even coverage than hard light, which creates hot spots.
- One or two lights on the subject: Your regular key light setup (see the softbox lighting guide for detail). These lights should point toward the subject and away from the green screen.
The goal: the green screen is lit to a consistent, bright, even green. The subject is lit by separate lights that don't hit the screen. These two lighting zones are independent.
Colour temperature: All lights in the setup should be the same colour temperature (all daylight-balanced at 5500K, or all tungsten). Mixing colour temperatures creates colour shifts that complicate keying.
Exposure: The green screen should be exposed approximately one stop brighter than the subject in the camera. Underexposed green screens produce muddy, darker greens that software keying handles less cleanly.
Subject Positioning and Colour Spill
Distance: Position the subject at least 1 metre from the green screen, ideally 1.5–2 metres. The further the subject stands from the screen, the less green light reflects off the screen onto their hair and shoulders (colour spill). Colour spill is the most visible quality problem in home green screen setups — it creates a green fringe around the subject's edges that makes virtual backgrounds obvious.
Clothing: No green. No green-tinted colours (some yellows, some teals). Dark clothing generally works well. Transparent or translucent elements (glasses, hair, loose fabric at edges) are where colour spill is most visible and where the key edge needs the most refinement in post.
Hair: Loose, flyaway hair is the hardest element for chroma keying. Hair at the edges of the frame where it meets the green screen requires fine-tuning the key settings in post. Tighter hairstyles produce cleaner keys with less refinement required.
According to a visual effects workflow analysis by Videomaker Magazine (2024), proper separation distance (1.5m+) and independent background lighting reduce post-production keying time by 60–70% compared to setups where subjects stand close to the screen with shared lighting.
Chroma Key in Software
Once the footage is captured correctly, keying in software is straightforward:
DaVinci Resolve (free): Colour page → Qualifier tool → click-and-drag across the green screen area. Adjust the High/Low/Softness sliders for edge refinement. Resolve's keyer is industry-standard quality.
Final Cut Pro: Effects → Keying → Chroma Keyer. Drag and drop onto clip. Click the dropper on the green screen area. Adjust the Strength slider.
Premiere Pro: Effects → Keying → Ultra Key. Apply to clip, use dropper on green area. The Ultra Key plugin handles edge refinement well with minimal manual adjustment on well-lit footage.
OBS Studio (free, for live streaming): Add → Filter → Chroma Key. Set key colour to green. On properly lit footage, the default Similarity and Smoothness settings often work without adjustment.
The quality of the key in software is directly determined by the quality of the lighting on set. Well-lit footage keys in under 2 minutes with minimal adjustment. Poorly lit footage requires extensive manual masking that may never look fully clean.
When to Use Alternatives to Green Screen
Green screen is not always the right choice for a virtual background. Alternatives:
A physical clean background: A painted wall, a clean bookshelf, or a professional fabric background produces a natural-looking setup that doesn't require keying at all. For most talking-head video and educational content, a physical background is less complicated than green screen and looks more natural on camera.
AI background removal (no green screen): Zoom, Teams, and some dedicated apps (Mmhmm, Mmhmm) use AI to remove the background without a green screen. Quality varies — edges around hair are imprecise and the background removal flickers on movement. For formal productions, AI removal without a green screen is not reliable enough. For casual video calls, it works adequately.
The choice: Green screen is worth the setup when the virtual background is a fixed part of the content's visual identity — a news-style desk background, a branded environment, a location-specific setting. For occasional use or casual backgrounds, a physical setup is almost always less work with better results.
The home studio softbox lighting setup covers the subject lighting side of the equation — a well-lit subject is as important as a well-keyed background for professional results.
Frequently Asked Questions
What is chroma key green screen?
Chroma key is a visual effects technique that replaces a specific colour (most commonly green or blue) in a video frame with a different background image or video. A green screen for chroma key is a uniformly lit green backdrop placed behind the subject. Video editing software detects the specific green hue and removes it, replacing it with any virtual background. The technique works because green is the colour furthest from typical human skin tones, making it easiest to isolate without affecting the subject.
Why is green used for chroma key instead of other colours?
Green was chosen as the chroma key standard because it's the colour most different from human skin tones across all ethnicities — this makes it easiest to isolate digitally without accidentally removing parts of the subject's face, hair, or hands. Green also reflects more light per unit than other colours, requiring less artificial light to achieve consistent brightness across the backdrop. Blue screen (bluescreen) is used in some contexts, particularly for subjects wearing green clothing.
How far should you stand from a green screen?
At least 1 metre (3 feet), ideally 1.5–2 metres (5–6 feet). The further you stand from the green screen, the less green light bounces back onto the subject (colour spill), and the easier keying is in post. Standing too close to a green screen is the most common cause of green fringing around hair, shoulders, and hands. If space doesn't allow 1.5m of separation, add a dedicated background light pointing at the green screen (not the subject) to keep the background brighter and better separated.
Do you need special lighting for a green screen?
Yes — proper lighting is not optional for clean chroma key results. The green screen itself needs even, consistent illumination (no hot spots or shadows) that's separate from the subject lighting. The subject needs their own front lighting that doesn't spill onto the green screen. Using a single light source for both produces uneven keying, green fringing, and muddy replacement backgrounds. The minimum functional setup is two lights on the green screen and one light on the subject.
Can I use a blue screen instead of green for chroma key?
Yes — blue screen (bluescreen) is a legitimate alternative to green screen and is preferred in some contexts. Blue is used when the subject is wearing green clothing, has green elements in their environment, or when the production involves CGI environments that require different colour separation. Green is more common for live-action because it requires less light to illuminate evenly and is further from most skin tones. In practice, modern chroma key software handles both colours equally well — the choice is usually based on what the subject is wearing.
What software do I need for chroma key editing?
Most professional video editing software includes chroma key tools. DaVinci Resolve (free version) has an excellent Qualifier-based keyer. Adobe Premiere Pro includes the Ultra Key plugin. Final Cut Pro has a built-in Chroma Keyer effect. OBS Studio (free) supports chroma key for live streaming. For mobile editing, CapCut and LumaFusion both include chroma key tools. The quality of the key depends more on your lighting setup than on the software — well-lit footage keys cleanly in any of these tools without significant manual adjustment.
Natalie BrooksNatalie Brooks is a video producer who works as a one-person crew for independent creators, corporate teams, and online educators. She writes about home studio setups, creator gear, and the production decisions that never come up in sponsored unboxings.
Good Setup. Scripted Delivery. Professional Output.
Once your green screen is set up, Teleprompter-Scrolling Scripts keeps your script on the camera viewfinder — so your delivery matches the production quality of your setup.
Use Free Online Teleprompter Get the Free App