How to Set Up a Home Teleprompter Without Hardware
![]() Wendy Zhang · May 20, 2026 · 9 min read
Wendy Zhang · May 20, 2026 · 9 min read
A best home teleprompter setup does not require a beam splitter glass rig, a production monitor, or a dedicated hardware unit that costs hundreds of dollars. For the vast majority of home recording scenarios — YouTube videos, online courses, vlogs, coaching content, and desk recordings for work — the device you already own is sufficient. iPhone, iPad, and Mac can all serve as capable desktop prompter solutions with the right app and a few minutes of physical setup.
Teleprompter-Scrolling Scripts is a free native app for iPhone, iPad, and Mac that provides both Camera mode (records video with script overlay) and Prompter mode (text-only scroll for use alongside any camera). This guide covers the specific setup for each device type and the minimal gear that makes the difference between a functional home teleprompter and a professional-feeling one.
What a home teleprompter setup looks like
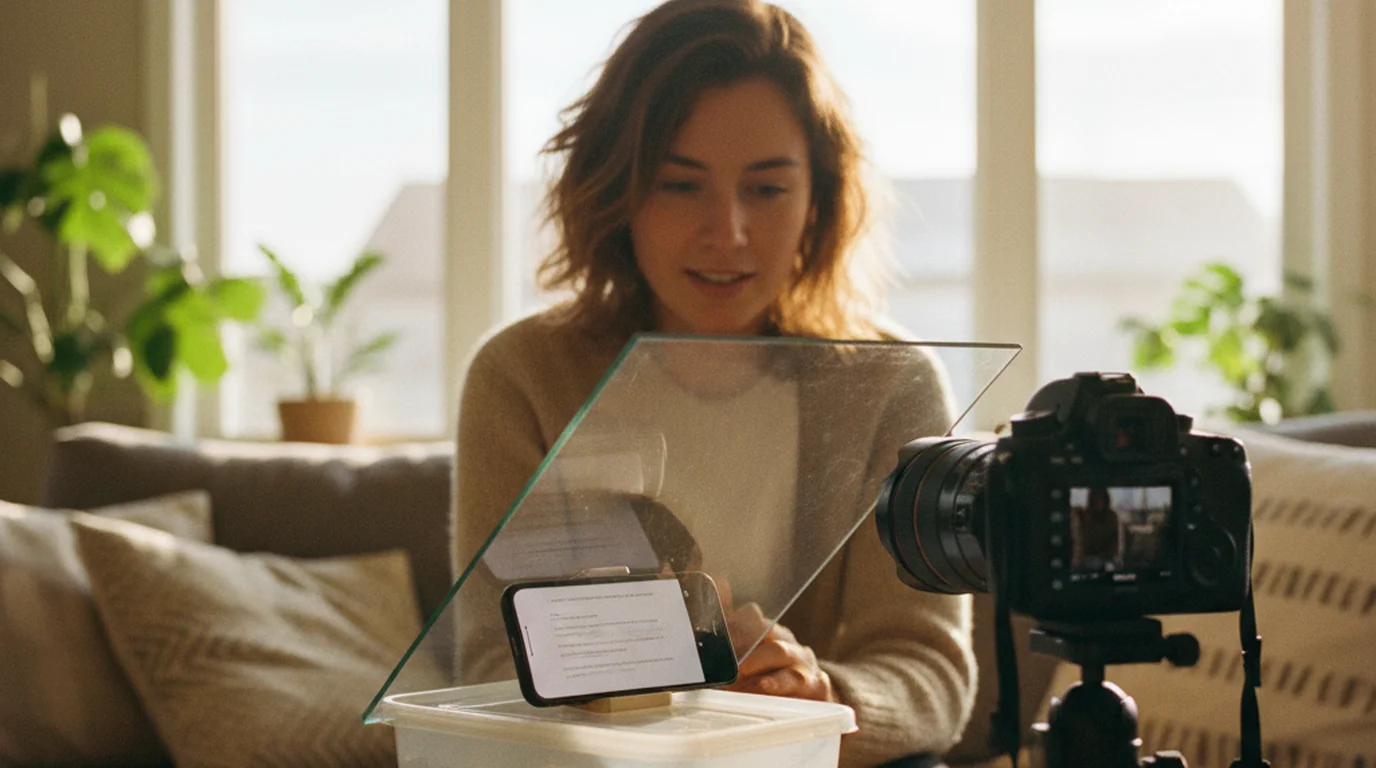
Professional broadcast teleprompters use a beam splitter — a half-silvered glass panel mounted in front of the camera lens at a 45-degree angle. Text from a display below the glass reflects toward the presenter, who reads it while appearing to look directly into the lens. The camera shoots through the glass without picking up the reflected text. This system delivers perfect eye contact with zero gaze deviation, but it requires a dedicated hardware rig, a separate display, and significant physical setup time. The most popular consumer version of this hardware is covered in the Elgato Prompter review if you want to compare hardware against software-only setups.
A home teleprompter setup replaces the glass rig with an app running on a device positioned near the camera lens. The presenter reads from the screen rather than from a reflection in glass. The eye-line deviation is slightly larger than with a beam splitter but is still minimal when the teleprompter screen is positioned close to the camera — close enough that most viewers watching on a phone or laptop screen cannot detect that the presenter is reading.
The core components of a software-based best home teleprompter setup are: a device (phone, tablet, or computer) running a teleprompter app, a stand or mount to position the device stably at the correct height and angle, and optionally a camera separate from the teleprompter device if you want the highest possible video quality. In most home setups, the teleprompter device and the camera device are the same — the iPhone handles both roles simultaneously in Camera mode, or the Mac handles both roles with Prompter mode running next to the built-in webcam.
The best home teleprompter setup for most creators is a phone or tablet stand, a free teleprompter app, and a few minutes of positioning adjustment. No glass rig required. The key variable is eye-line alignment: how close the text is to the camera lens determines how natural the delivery looks on camera.
Home teleprompter with iPhone
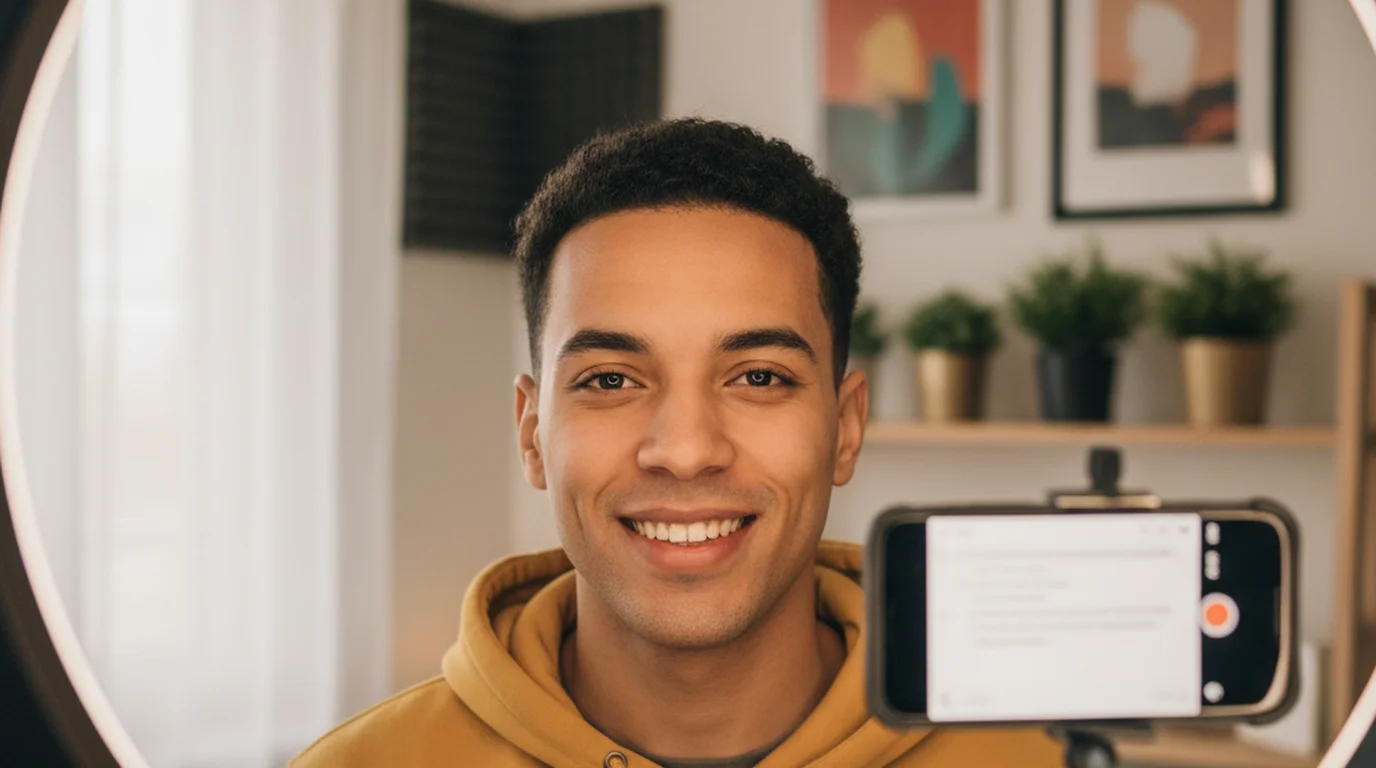
iPhone is the most compact and versatile home teleprompter option. Camera mode in Teleprompter-Scrolling Scripts records video directly on the iPhone with the script overlaid on the front camera preview — making the iPhone both the teleprompter and the camera simultaneously. This setup is ideal for short-form vertical video: TikTok, Instagram Reels, and YouTube Shorts.
The physical setup requires a phone stand or small tripod that holds the iPhone stable at the height of your face. A flexible gorilla-pod style tripod works well for desk setups — it can be positioned at eye level on a shelf, stack of books, or desk riser without any additional mounting hardware. Mount the iPhone in portrait orientation for vertical video or landscape for widescreen formats.
In Camera mode, set the text area to two to three lines positioned at the very top of the screen, as close to the front camera lens as the layout allows. This placement is the most important variable for natural eye-line alignment. With the text near the top, your gaze angles only slightly upward from the lens — imperceptible to most viewers. With the text in the middle or bottom of the screen, the downward gaze is visible and breaks the direct-to-camera feel.
Set scroll speed to 120–140 words per minute for most short-form content. Run one test recording before your actual session to confirm the pace feels natural. Adjust up or down by 10–15 words per minute based on the playback. The recorded video saves to your iPhone Photos library and does not include the script text in the final clip.
Home teleprompter with iPad
The iPad is the best home teleprompter for long scripts, online courses, coaching recordings, and seated desk setups where a larger screen makes sustained reading easier. The iPad's screen size — 10 to 13 inches depending on the model — allows for larger text and more visible lines simultaneously, which reduces the cognitive load of reading while simultaneously performing to camera.
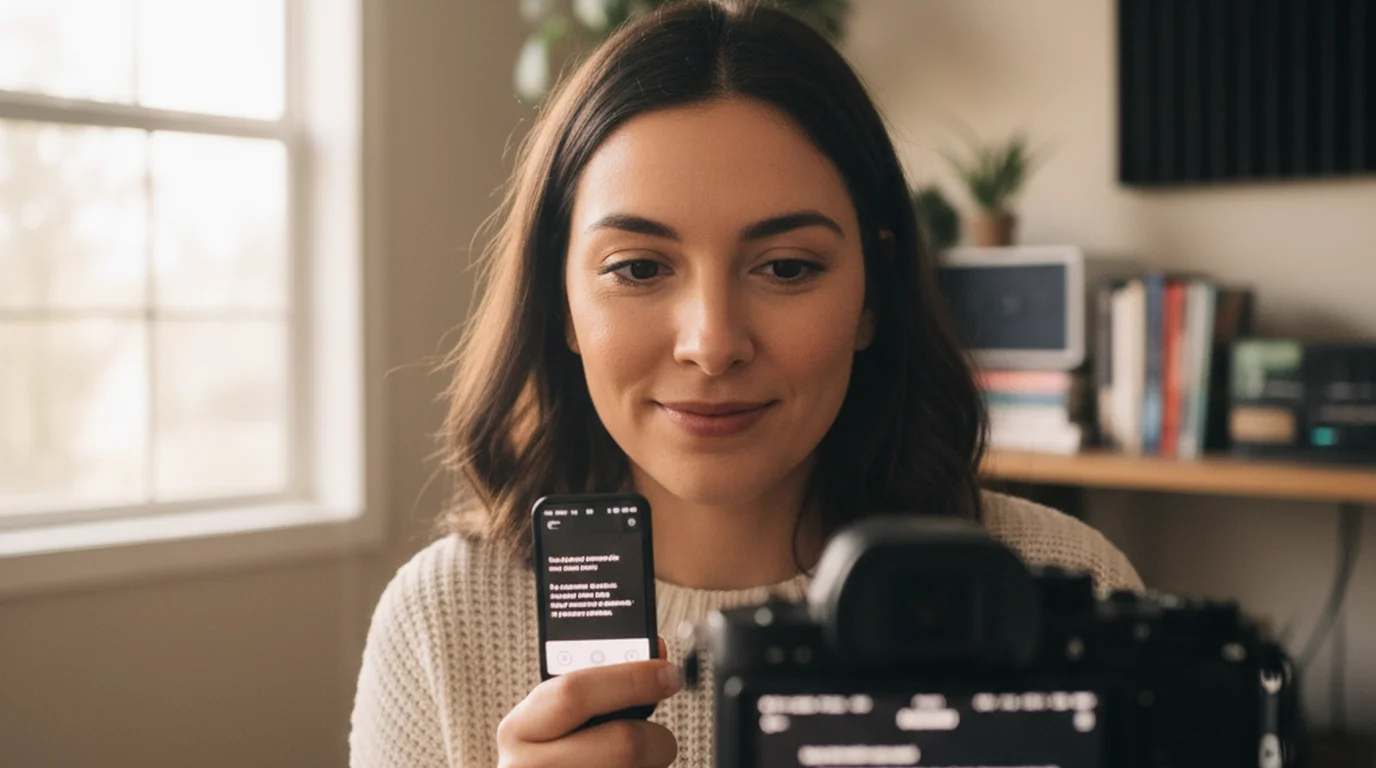
For iPad home teleprompter setups, Prompter mode is typically the right choice. Prompter mode displays only the scrolling text with no camera involvement. You position the iPad at or near eye level and use a separate camera — a Mac webcam, a DSLR, or a standalone camera — to record. The iPad acts purely as the script display, and the camera records independently.
The most practical physical setup for iPad desk recording is a tablet stand positioned directly behind or beside the camera. If you are recording with a Mac's built-in webcam, prop the iPad on a stand behind the laptop lid at approximately the same height as the webcam. If you are using an external camera on a tripod, position the iPad immediately above or beside the camera at the same height. Either approach keeps the eye-line deviation from the lens minimal.
For creators who record online courses or long-form coaching modules — content that involves ten to thirty minutes of continuous delivery — the iPad's larger battery life and screen size make it more comfortable than iPhone for extended teleprompter sessions. Load the full script into Teleprompter-Scrolling Scripts, use Prompter mode, and set the scroll to a pace that allows for comfortable reading without rushing. The app runs fully offline, so there is no risk of a connection interruption mid-session. For a full walkthrough of iPad-specific settings and positioning, see the iPad teleprompter app guide.
Home teleprompter with Mac
Mac is the best home teleprompter setup for creators who record primarily at a desk — YouTube tutorials, talking-head videos, webinar presentations, and Zoom recordings. The Mac teleprompter app supports both Camera mode and Prompter mode, and the large display makes it easy to run the teleprompter alongside other applications without constantly switching windows.
In Camera mode on Mac, Teleprompter-Scrolling Scripts uses the built-in FaceTime camera (or an external USB camera if one is connected) to record video with the script overlaid. This is a self-contained recording setup — one Mac, one app, one recording — suitable for YouTube videos, course content, and any desk-based talking-head format. The recorded file saves locally without any cloud processing.
In Prompter mode on Mac, the app displays the scrolling text in a window that you can position adjacent to your Zoom window, your recording app, or your presentation software. This is the setup for Zoom calls, webinars, and any context where an external tool handles the recording or the live session. The script scrolls in the Prompter mode window while Zoom or your recording app runs in the primary window — no switching required, and no camera conflict because Prompter mode does not access the camera.
For YouTube desk recording specifically, the combination of Camera mode on Mac with a USB microphone and a simple backdrop produces broadcast-quality talking-head footage without any additional hardware beyond what most home office setups already have. The desktop prompter role is handled entirely by the app, and the recording workflow goes straight from the app to your editing timeline. If you want to test the concept before downloading anything, the online teleprompter runs in any browser at no cost.
Essential gear for a home teleprompter setup
The minimum required gear for a functioning best home teleprompter setup is a compatible device (iPhone, iPad, or Mac), the free Teleprompter-Scrolling Scripts app, and something to hold the device stable. That last item — a stand or mount — is the most commonly overlooked component, and it is the one that has the biggest impact on the physical quality of the setup.
For iPhone, a flexible mini tripod (such as a gorilla-pod style mount) or a dedicated phone stand with height adjustment covers most scenarios. The key requirement is that the stand holds the iPhone at face level without wobbling and without requiring you to touch the device to adjust it between takes. A stable mount means consistent framing across multiple takes, which saves time in editing.
For iPad, a tablet stand with angle and height adjustment is ideal. A flat desk stand that props the iPad at a fixed angle works for setups where the iPad is positioned beside a laptop or monitor, but for setups where the iPad needs to be at a specific height relative to an external camera, an adjustable arm mount or a stand with vertical adjustment gives more flexibility.
Optional additions that meaningfully improve the quality of a home teleprompter recording: a ring light or softbox for even, controlled lighting (the single biggest quality improvement available for most home setups); a neutral backdrop — a plain painted wall, a fabric backdrop, or a tidy bookshelf — that keeps the visual context clean; and a dedicated microphone, either a lav microphone clipped to the shirt or a USB condenser microphone on the desk, for clean audio that does not rely on the built-in iPhone or Mac mic. None of these are required to use a home teleprompter effectively, but each one compounds with the others to produce a more professional-looking final video.
Best home teleprompter settings for natural delivery
The settings that produce natural delivery in a home teleprompter setup are the result of calibration, not defaults. Every speaker has a different natural pace, every script has a different density of information, and every recording environment has different visual conditions. Getting the settings right for your specific situation is a fifteen-minute investment that pays back on every recording you make afterward.
Start with scroll speed. The average comfortable speaking pace for scripted delivery is 120–150 words per minute. For YouTube and longer-form content, 120–130 wpm tends to feel more natural and gives room for emphasis and pauses. For short-form content like TikTok, 130–150 wpm matches a more energetic delivery style. Set the speed, record 90 seconds of your actual script, and watch the playback. If you are visibly reading — if the delivery has a monotone cadence or stilted rhythm — slow down the scroll. If you are rushing or trailing off at the end of sentences, speed it up slightly.
Text size should be the largest size that allows two to three lines to be visible simultaneously. Larger text is always better for reading comfort under pressure — the stress of being on camera narrows focus, and large text is easier to parse at a quick glance. Use white text on a dark background (or black text on white) for maximum contrast under your recording lighting conditions. In bright rooms with a lot of ambient light, dark text on a white background can wash out; white on dark holds contrast better in most lighting.
Paragraph breaks in the script function as natural pause points during delivery. Every time you reach a paragraph break, you have permission to pause, breathe, and look natural before continuing. Scripts formatted as one long block of text produce machine-gun delivery. Scripts with frequent short paragraphs produce delivery that feels measured and confident. Break your script into two-to-three sentence paragraphs before loading it into the app — the extra formatting time consistently produces better takes.
Home teleprompter for vlogging and YouTube creators
The best teleprompter for vlogging at home is one that disappears into the workflow — setup is fast, the recording produces natural delivery, and the output goes directly into your editing process without extra steps. Teleprompter-Scrolling Scripts is designed around exactly that workflow for iPhone, iPad, and Mac vlog and YouTube setups.
For vlogging on iPhone, Camera mode is the complete solution: mount the iPhone on a tripod, open Teleprompter-Scrolling Scripts, load your script, set the text area to the top of the screen, and record. The file saves to Photos and is ready for import into any editing app immediately after recording. There is no export process, no cloud upload, and no account required. The entire session from setup to recording takes under five minutes once the physical mount is in place.
For YouTube desk recordings on Mac, Prompter mode alongside your recording app of choice produces the same result with more flexibility on camera quality. Use the built-in Mac webcam for convenience, or connect an external USB or HDMI camera for higher resolution. The teleprompter script runs in Prompter mode on the Mac display while your recording app captures the video. This setup also works cleanly for screen recording content where you need to speak to camera between screen segments.
One vlog-specific tip: write your scripts with a hook in the first 15 seconds and a clear call-to-action in the last 30 seconds, then keep the middle conversational and based on key points rather than word-for-word. The teleprompter handles the critical sections — the hook and the CTA — while the middle of the video benefits from the energy of more natural, loosely scripted delivery. This hybrid approach produces vlogs that have both a confident opening and a reliable close, with authentic energy in the body of the content.
Frequently Asked Questions
What is the best home teleprompter setup?
The best home teleprompter setup depends on your device. For iPhone: use a phone stand or tripod, open Teleprompter-Scrolling Scripts in Camera mode, position the text area near the front camera, and record. For iPad: place on a stand at eye level with Prompter mode for longer scripts. For Mac: run Prompter mode next to a Zoom window or use Camera mode for webcam desk recording.
Do I need a glass rig for a home teleprompter?
No. Glass rig teleprompters (beam splitter systems) are used in broadcast production. For home recording, a teleprompter app on your phone, tablet, or Mac works by displaying the text on screen. If you position the text close to the camera lens, you get a similar eye-line effect without any hardware purchase.
What is the best teleprompter for vlogging at home?
For vlogging, use Teleprompter-Scrolling Scripts on iPhone in Camera mode. Mount the iPhone on a tripod, switch to portrait mode for vertical video, set the text area to 2–3 lines at the top of the screen near the front camera, and record. The scroll speed at 120–140 wpm produces a natural delivery for most vlog styles.
What gear do I need for a home teleprompter setup?
The minimum is a phone or tablet stand (to hold the device stable), a compatible device (iPhone, iPad, or Mac), and the free Teleprompter-Scrolling Scripts app. Optional additions that improve quality: a ring light or softbox for even lighting, a neutral backdrop (plain wall or fabric), and a lav microphone or USB microphone for clean audio.
 Wendy ZhangI build Teleprompter-Scrolling Scripts for creators who want a simple, reliable way to read scripts on iPhone, iPad, and Mac.
Set up your home teleprompter today — free
Teleprompter-Scrolling Scripts is free on iPhone, iPad, and Mac. Camera mode, Prompter mode, offline use — no subscription, no hardware required.
Use Free Online Teleprompter Get the Free App